Agile Atlassian Jira Jira Cloud Implementation & Configuration
How to Manage Workflows Using Kanban Boards in Jira
Jira is a versatile tool used regularly by teams following Agile practices like Kanban and Scrum. To help such teams, we have written this article to demonstrate how workflows can be managed using Kanban boards in Jira. It also throws light on how to use different Kanban Board functions like WIP limits, swimlanes, Kanban Backlog, and the like.
But before we jump into the nitty-gritty of it, let’s get a basic understanding of Kanban boards.
Here’s what is covered in this blog post:
- What is a Kanban Board in Jira
- Why Use Jira Kanban Boards
- How to Use Kanban Boards to Manage Workflows in Jira
- Jira Apps for Kanban Board
What is a Kanban Board in Jira

Atlassian defines the Kanban board as “An agile project management tool, designed to visualize work, limit work-in-progress, and maximize efficiency”.
At the heart of a Kanban board is the way work is visualized in the form of workflows. Hence, a simple Kanban workflow consists of “ To-do”, “In Progress” and “Done”. This is represented through columns on the Kanban Board. Every column (To-Do, In Progress, Done) reflects the current stage of development. The tasks, issues, or user stories, called cards in Kanban, are then distributed across these columns depending on what each member of the team is currently working on.
Kanban boards work equally well for Agile and DevOps teams to organize and monitor their daily work.
What is Kanban Methodology
Toyota introduced the concept of Kanban in the 1940s, which initially meant “billboards” or “visual signals”. The idea behind it was to map out work for teams to help them stay on the same page. Since then, Kanban boards have come to be used by every team (business or technical) to help them track their work continuously and improve their efficiency.
As such, Kanban is a method based on the continuous delivery of work. Jira Software Kanban boards are an extension of this Kanban method to monitor and keep track of the team progress by improving their cycle times.
Types of Kanban Boards
Kanban boards are divided into 2 types depending on the way it is implemented and how teams using the Kanban boards are placed.
Accordingly, we have Physical Kanban boards and Digital Kanban boards.
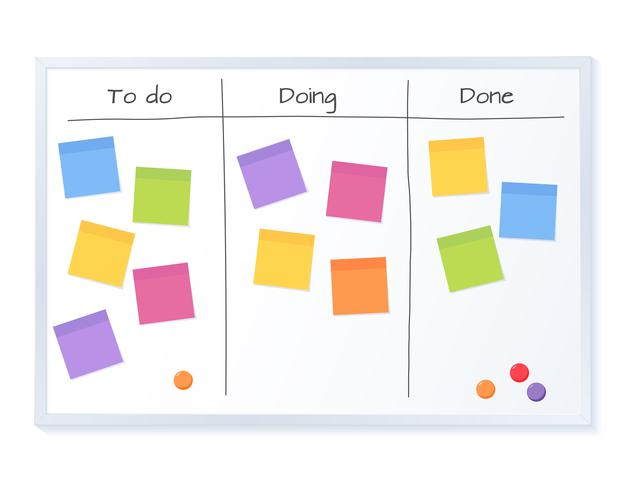
Physical Kanban boards are a perfect choice for teams that are physically co-located. They are generally blackboards or whiteboards divided into vertical columns, consisting of sticky notes which have task-related information written on them. These notes are then moved across the board based on whether the task is “In Progress” or “Done”. This helps everyone to be on the same page.
But nowadays, a lot of teams work remotely and often do not share the same office space. So for these remote teams, Physical Kanban boards transformed digitally and gave rise to Digital Kanban boards.
These digital boards are easy to set up, can be shared with team members working in remote locations, and can be updated asynchronously to keep everyone aligned.
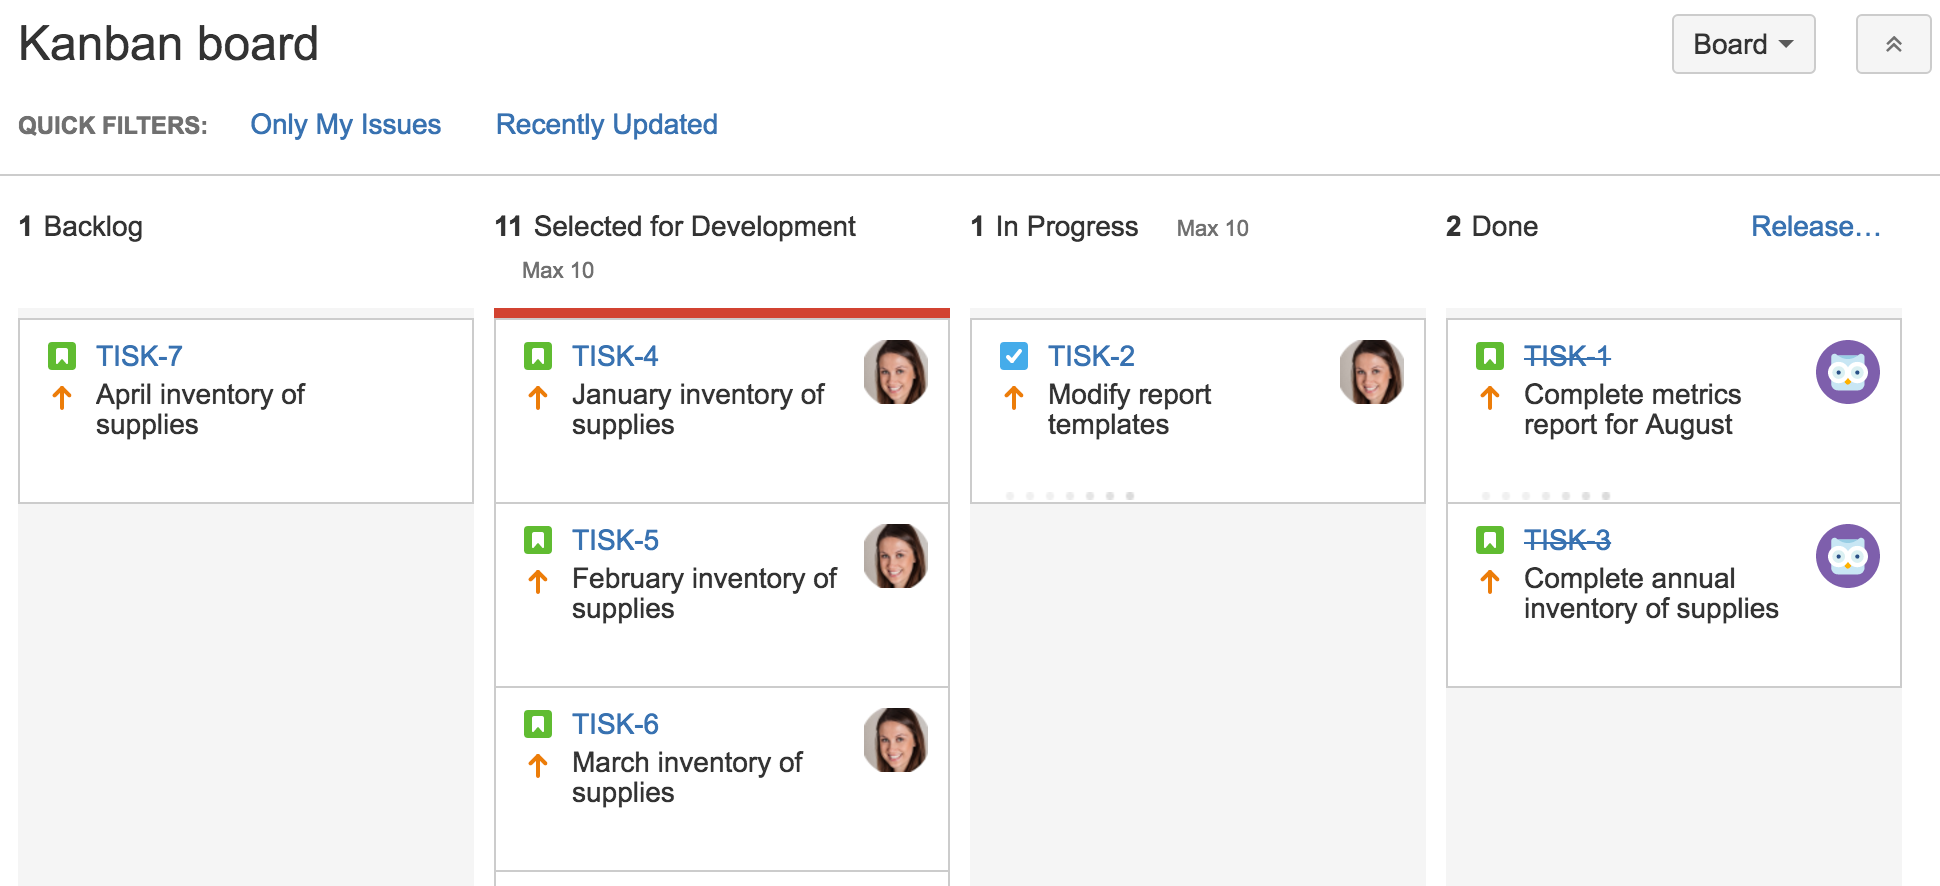
Also as Kanban grew in popularity with software and engineering teams, the need for adopting a more robust and customizable digital Kanban board became necessary. So tools like Jira Software came up with out-of-the-box Kanban project templates that made setting up and customizing Kanban boards a breeze.
Teams can now easily customize their Kanban boards by setting WIP limits, creating swimlanes, and even turning on the Kanban Backlog.
To understand these terms better, let’s have a look at the elements of a Kanban Board.
Elements of a Kanban Board
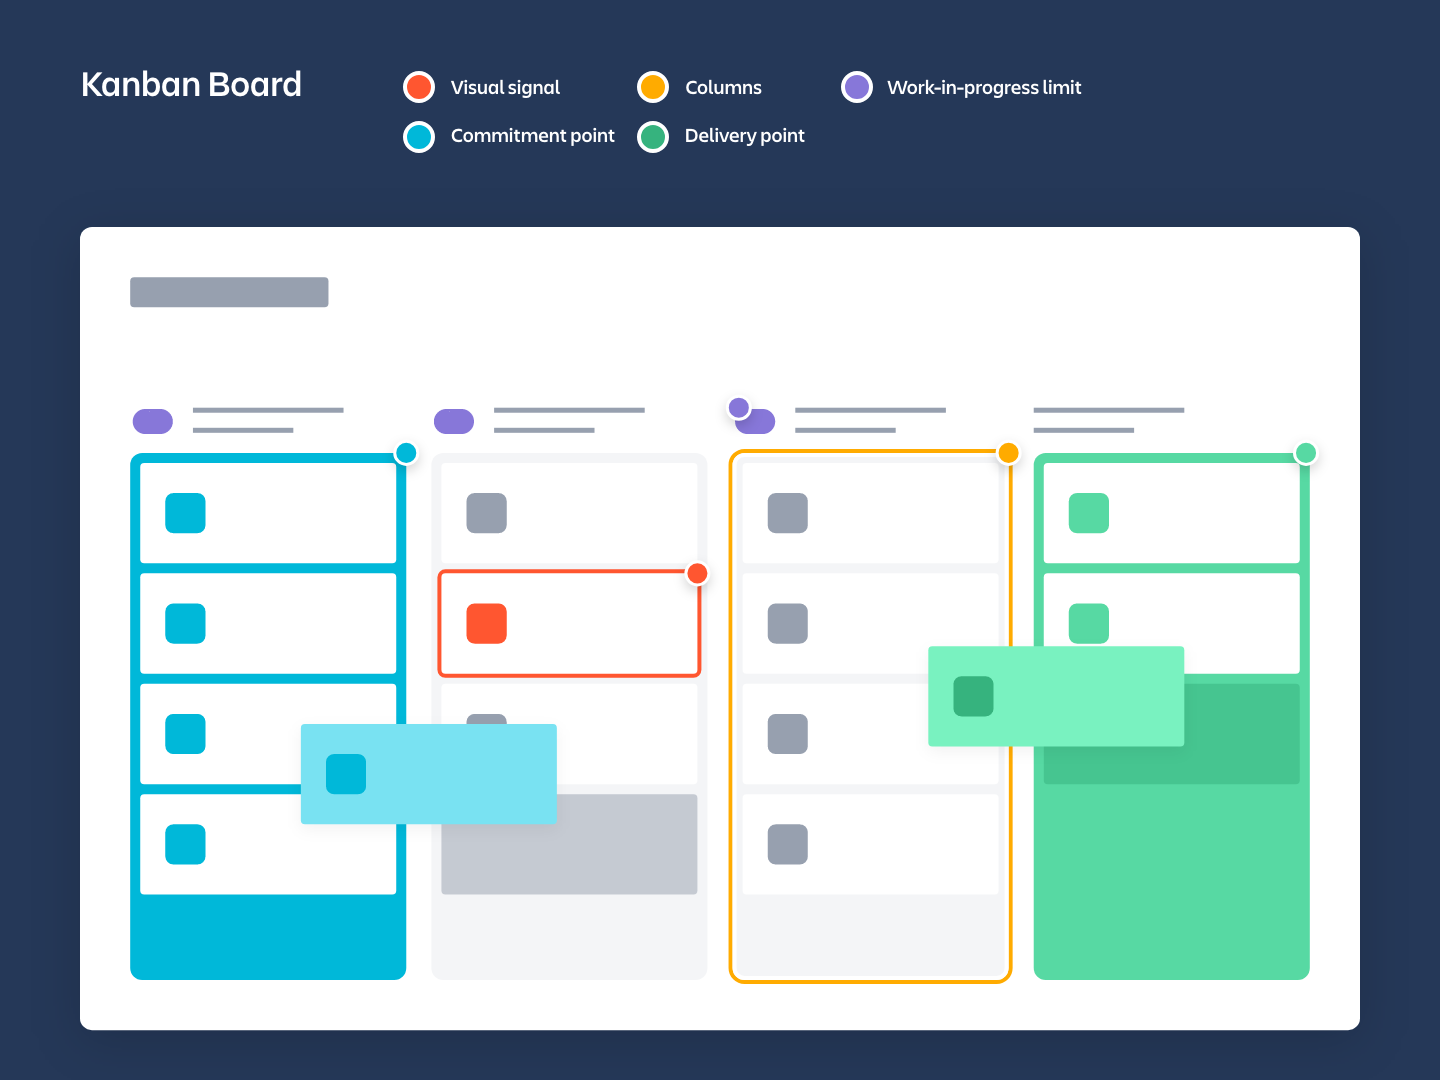
Visual Cards
One of the basic units of a Kanban board is a card. These visually represent a task, an issue, or a bug. It’s important to have one card per task to avoid confusion. In agile teams, these cards can also be user stories. Once pinned onto the Kanban board, such cards provide a visual representation of the current tasks the team is working on.
Workflows
Columns on a Kanban board represent workflows for your team. Each column represents a particular state in the development cycle of your project. The workflows can be as simple as TO DO- IN PROGRESS- DONE or something more complex. Kanban cards flow across these different columns until the completion of their workflow.
Work-in-progress (WIP) limits
WIP limits are the maximum number of cards that can be in a particular column at any given time. So for example, for a column with a WIP limit of 3, you cannot add more than 3 cards to it.
Once a WIP column limit has been reached, the team needs to work towards moving the cards forward before new cards can move into that column. This is extremely efficient to identify bottlenecks early on in your project.
Swimlanes
Where columns are a way of vertically dividing your work, swimlanes are great for horizontally grouping similar issues together. It’s a way of categorizing issues on a Kanban board so that the teams can easily separate different work types and view issues based on different criteria like issue type, labels, etc.
Backlog
For Kanban teams, a Backlog is a place where all the stakeholders – the customers, product managers, or the team members can put in their ideas. These ideas are then picked up by the team members once they are ready to take them on.
Commitment point
A commitment point for the team is when an idea is picked up from the Backlog and work starts on it.
Delivery Point
The delivery point is the endpoint in a Kanban team’s workflow. It represents handing over a particular product or service to the customer. As is apparent, the time elapsed between the commitment point to the delivery point must be as small as possible. This time is called the Lead time in Kanban projects and teams always work towards decreasing it.
Why Use Kanban Boards in Jira
The benefits of using Kanban boards in Jira are immense. This is because Jira provides many easy-to-use, pre-configured Kanban board templates and rich features that can help business and software teams, alike, manage their work efficiently and increase productivity.
Let’s have a look at just some of the features Kanban Boards provide.
Benefits of Kanban Boards
- Promoting transparency by displaying where work stands at a glance. This helps teams communicate effectively as Kanban boards become a single source of truth.
- Kanban boards allow for effectively depicting and configuring simple or complex workflows depending on the nature of the project.
- Bottlenecks can be prevented early on in projects by setting WIP limits.
- Jira Software’s Kanban boards provide visual metrics in the form of Cumulative workflow diagrams and Control charts. This helps monitor the team’s progress in real-time and helps drive better decisions.
Let us also see the difference between the most popular boards Jira has – Kanban boards vs. Scrum Boards. It’s necessary to understand the differences between them because they both are often mistaken for each other.
Kanban Boards vs. Scrum Boards
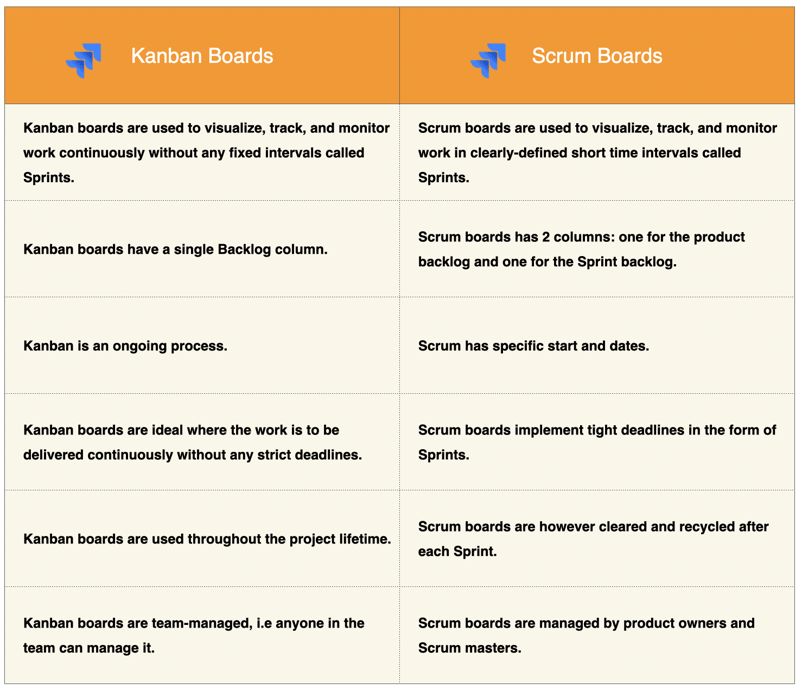
For more on this, read the full breakdown on Kanban and Scrum boards.
You can also explore how to use Scrum boards with Jira.
Having understood the background and basics around Kanban boards, it’s time to see how we can use Kanban Boards to manage workflows in Jira.
How to Use Kanban Boards to Manage Workflows in Jira
Getting started with Kanban Boards
Using Kanban boards to manage your workflows in Jira is really a “start with what you already do” kind of method.
So you gather your team together, compose your workflow (columns), figure how and when new work (cards) get added on the board, decide the scope of one card, decide on commitment and delivery points and you’re ready to get to work.
Simple? Indeed, but we are missing out on a few things. Let’s see.
Creating a Kanban Project
After logging in to Jira, you get an option to create a project. Make sure you select the Kanban software development project. Once you provide the name and the required details, Voila! You are successfully redirected to a screen that shows you your first Kanban board.
This is where you start working.
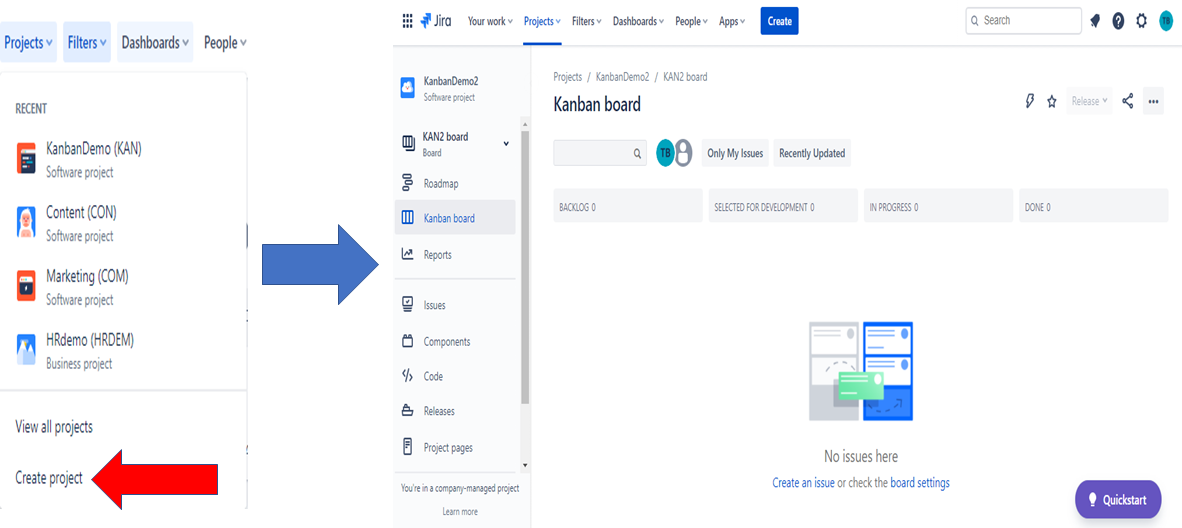
Creating a Kanban Board
There is another way you can create Kanban Boards. One of the ways is mentioned in the above section. Let’s quickly see how you can create a Kanban board with the other method.
Click on the “KAN board” option on the left sidebar.

Note: KAN is the key to the project you have created.
Move down the drop-down list. At the end of the list, select the “Create Board” option.
You will be directed to a screen that will ask you to choose the board you want to create. Click on the Kanban Board here

You will be prompted to select one option out of the three. 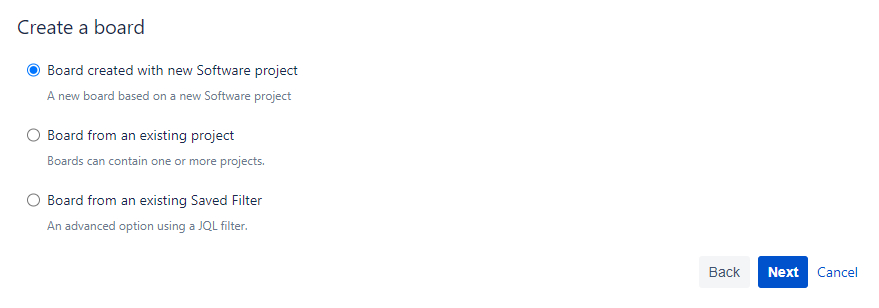
Select “Board created with the new Software project”. Once you give a name to the project, you will get to see your first Kanban board.
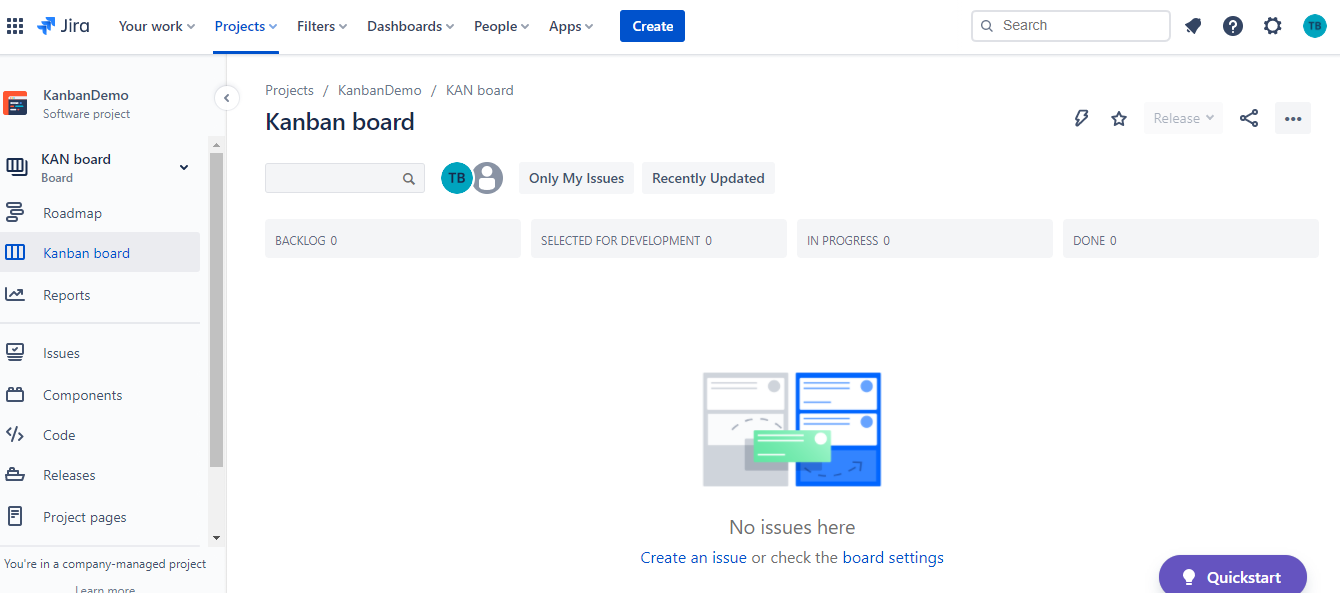
Note: This is another way that you create a new project and a new Kanban board.
Configuring the Kanban Board
The default Kanban board has 4 columns i.e: Backlog, Selected for Development, In Progress, and Done. This forms your “out-of-the-box” workflow. Many teams want to add the “QA/ Code Review” stage in their workflow. You can easily modify this on your Kanban boards.
Following are the ways in which you can configure your Kanban boards.
Configure Workflows
To configure columns and workflows, click on three dots at the right corner of the screen, then select “Board settings”

There are a variety of options under the “Board Settings” tab that allow you to modify columns, add swimlanes, change card colors, etc. Let’s take a look at the relevant ones here.
For configuring the workflow, select the “Columns” option. At the bottom right corner, you can modify the columns.
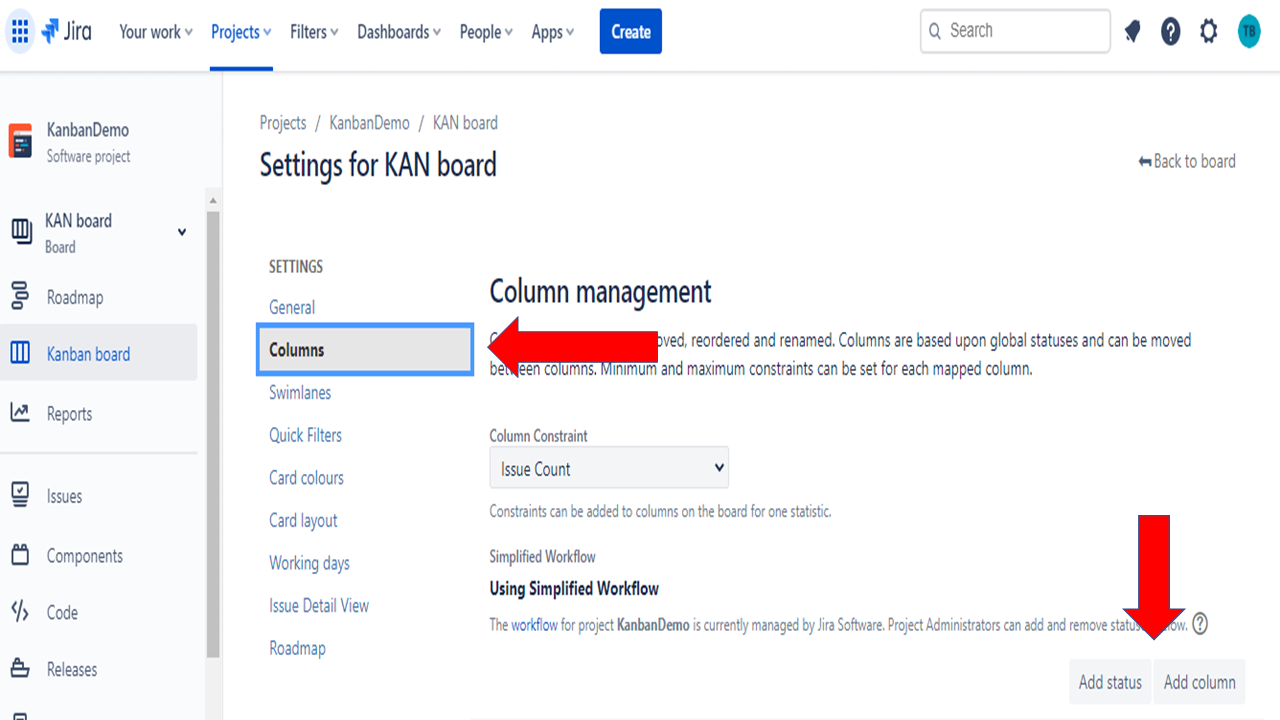
You can either add a status or column with the buttons on the right or hit the trash icon to remove a column. Once you have the workflow columns you want, hit “Back to board” in the top-right corner.

For the purpose of this section, we have added a new column called “Code Review” in our default workflow.
Create Swimlanes
As discussed earlier, swimlanes are a way of categorizing issues on your board so your agile teams understand which issues to pick up next.
By default, issues of “Highest” priority are categorized under the “Expedite” swimlane. All the others fall under “Everything Else”.
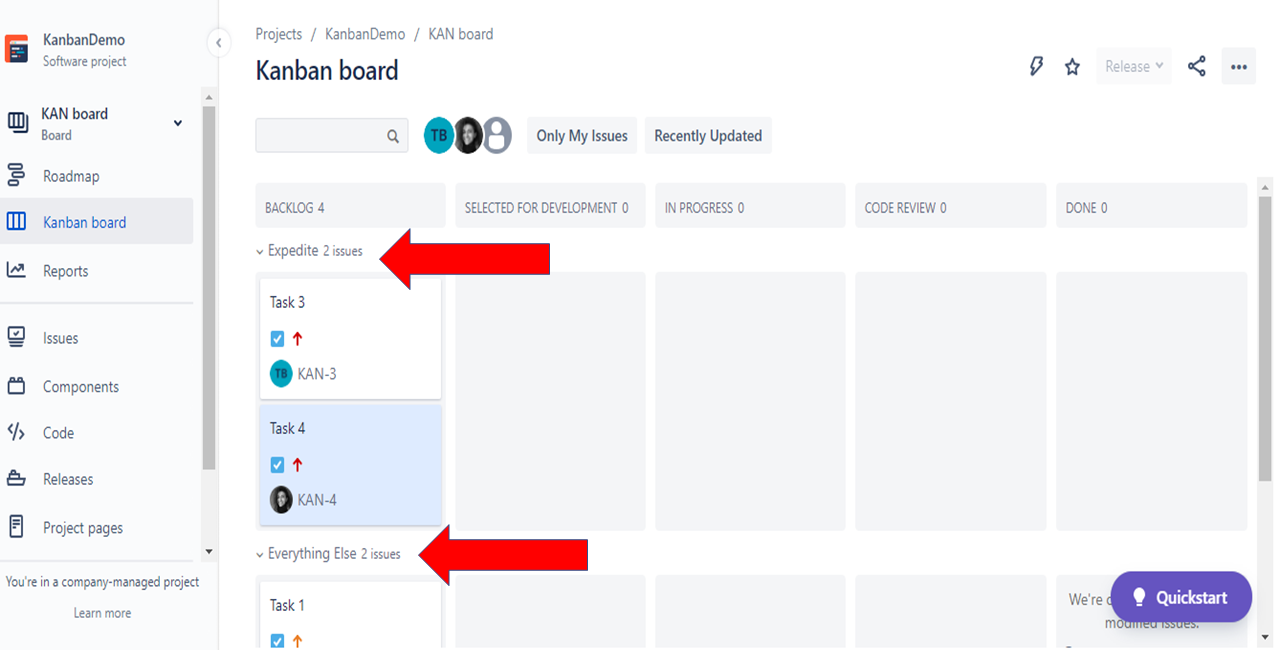
Note: Before we move on to adding swimlanes, it’s important to add issues to your board. Creating issues is simple, we will have a look at it in the coming section.
Now let’s have a look at how to edit the default swimlanes. You need to go to the “Board Settings” by clicking the three dots on the top right corner and clicking on “Swimlanes”
You can add swimlanes for your issues on this screen using JQL.
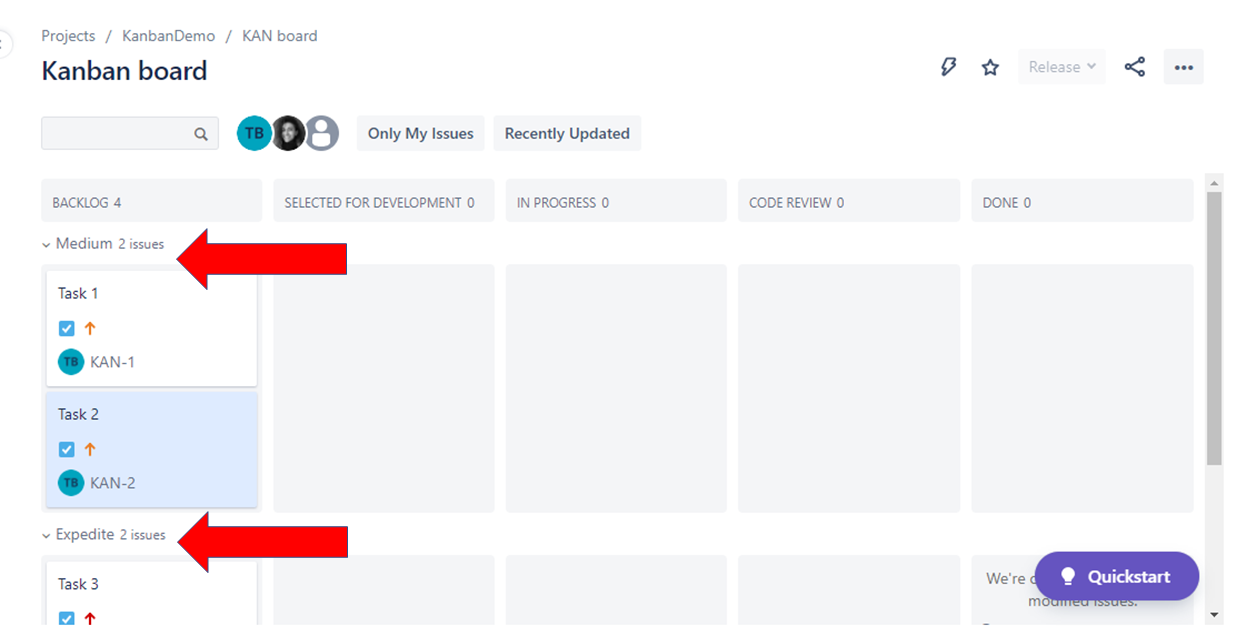
In the following example, a new swimlane is created for issues with “Medium” priority.

After adding the required JQL query, hit the “Add” button. And there! You now have your own custom Swimlane as below.
Set WIP limits
We have already seen the importance of adding WIP limits. Here, we focus on that aspect a little more, especially since they form an important part of identifying bottlenecks well in advance. By highlighting them this way, your team can reshuffle its priorities and figure out a more realistic approach to your plan of action.
You can configure these using the “Columns” tab in “Board Settings”. You can set the minimum and maximum for each column there.

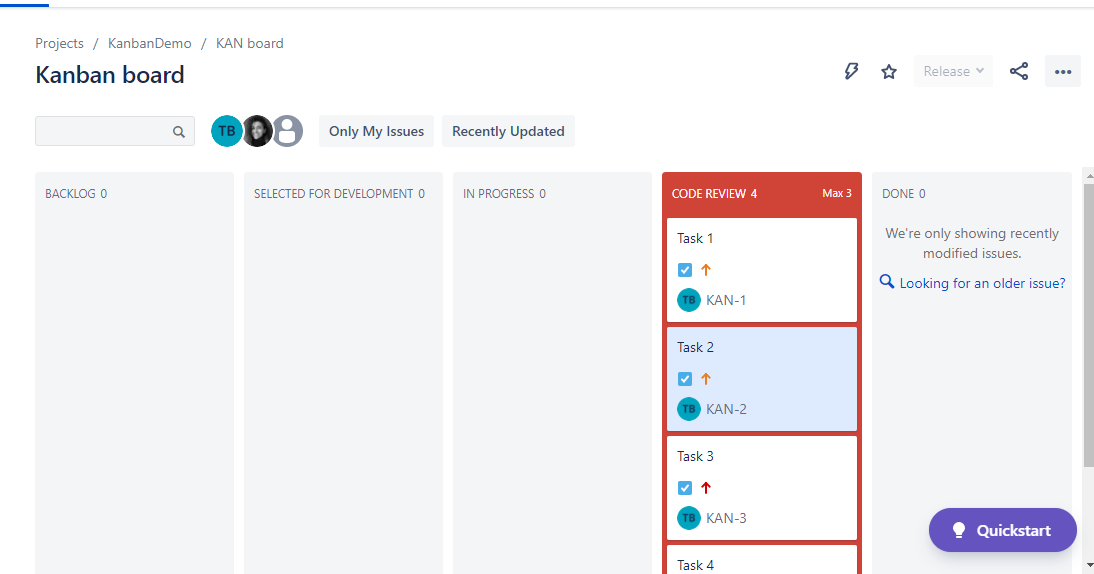
We have set the WIP limit of the “Code Review” column to 3. This is an ideal option because the review is an important part of a project lifecycle and if too many reviews are bottled up in a column, it can be a major hurdle to move ahead.
If the issues cross the WIP limit, they are shown in red under the specific column. It gives us a clear visual cue to start working on moving them forward.
Adding Issues to the Backlog
Under the correct project, click on the “Create” button. Start by adding issue types – tasks, bugs, epics, or user stories. Keep the summary simple and provide comprehensive details.
By default, new issues created come under the “Backlog” column. 
Once the issues have been created, team members can select them according to their priorities in the Backlog column. You can change the status to “Selected for Development” when you start working on them.
Prioritizing the Backlog
Sometimes it’s necessary to prioritize or re-prioritize issues. For doing so, you move the cards up and down by “drag and drop” in the “Backlog” column. In Kanban, it’s always the first column of your board.
The Kanban team always focuses on the current issues. So the product owner can re-prioritize the tasks without affecting what the team is working on. As long as the most important items find their way to the top of the Backlog, the development team is assured that they are delivering value to their customers.
Tracking Progress with Reports
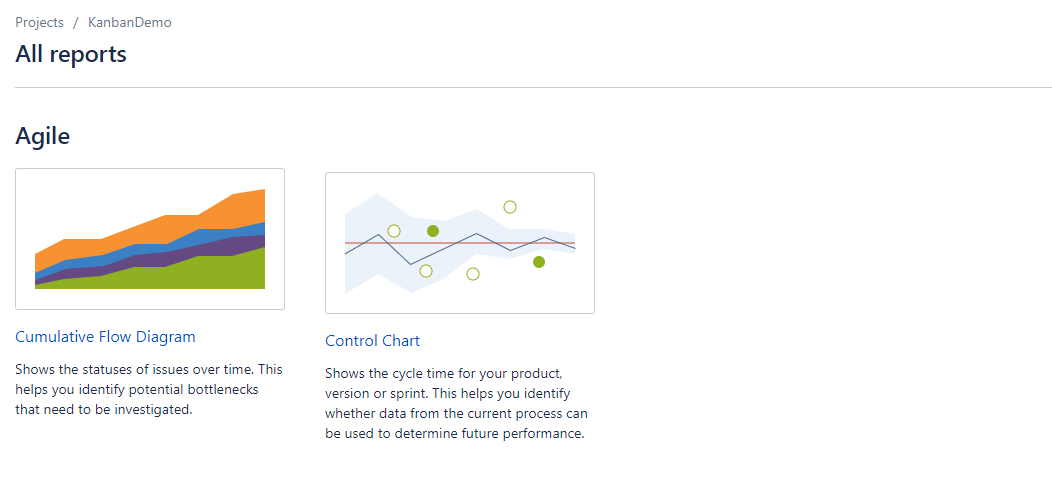
Two very important reports in Kanban projects are Control Charts and Cumulative Flow Diagrams. They are used to track the real-time progress of teams. You can find them under the “Reports” section of the sidebar. Sometimes the “Reports” tab is not visible in the sidebar list, you can easily enable it in “Project Settings” > “Features” > “Reports”.
Control Charts
These charts can be used to answer important questions like:
- Are certain issues taking too long to progress? Are they being bumped down due to other “High” priority issues?
- Does it take long for issues to transition from one state to another?
- How’s your team’s cycle time?
Cumulative Flow Diagram
This report helps you visualize your efforts and maps them against the overall progress of your project. It shows the status of the issues over a period of time. Any bottleneck appears as a sudden spike in the diagram and is worth looking at.
Using the Advanced Settings
By now, the phenomenal power of Jira Software must be evident. But wait, there’s more! Read on for some advanced settings to unleash the full potential of Jira.
Automate Tasks
You can automate repetitive tasks using the “Automation” feature. This is a great way to make your boards look cleaner and keep your work up to date.
Find some of the most used automation rules for Kanban in Jira using its Automation Library.
Create a Separate Backlog
Sometimes the Backlog column on your Kanban board can become long and unmanageable. So this is the time you use Kanban’s Backlog feature. Using this feature you can create a separate Backlog space for your Kanban board. It appears as a different tab in your project under the left sidebar.
The product owners can now build and prioritize their backlogs without disturbing the team. Once the work needs to be handed over to the team, it can simply be moved under “Selected for Development”.
Read more about enabling Backlog in Kanban.
Jira Apps for Kanban Boards
Jira is a great tool for managing and tracking work, but its power is augmented with the help of useful apps available on the Atlassian Marketplace.
Here are a few apps which can be used with Jira.
Git Integration for Jira – Provides integration for Git Commits, Branches, Tags, and Pull Requests in Jira.

Jira Workflow Toolbox – Provides limitless customization of workflows without having to code.

ScriptRunner for Jira – Automate workflows and issues, extend Jira and improve UX with Groovy Scripts and JQL.

eazyBI Reports and Charts for Jira – Analyze and visualize Jira using dozens of template reports, custom report builders, and interactive reports.

Find the top trending 15 apps for Jira in 2021.
Conclusion
Jira Kanban boards are a great way to manage workflows. We have seen how Kanban methodology has evolved from sticky notes on a whiteboard to cards on a digital Kanban board.
We also went over some distinct features of Kanban boards like WIP limits, swimlanes, commitment points, and delivery points, a clear and concise difference between Kanban and Scrum Boards.
And finally, we discussed how all these elements of Kanban boards fit together to help you manage your workflows more effectively and intuitively.
Recommended Reads:
- How to Use Jira for Non-Software Projects (The Pro Guide)
- How to Implement Agile in Jira Cloud
- GDPR: The Complete Guide to Compliance Regulations in Jira
- How to Use Sprints in Jira
- A Guide to Advanced SLAs in Jira Service Management
- Jira Time Tracker: Easy Time Tracking and Reporting in Jira
- How to Manage Quotes in Jira: The Complete Guide
- How to Create Jira Filters
- How to Set up Roadmaps in Jira


